Jump to Section:
Overview
You can upload data to CZ ID for SARS-CoV-2 consensus genome assembly through the CZ ID command line interface (CLI). After uploading data, SARS-CoV-2 consensus genomes will be automatically assembled against the Wuhan-Hu-1 reference sequence (accession number MN908947.3). You can then view and download the assembled genomes through the CZ ID web application.
Here we describe how to upload files to automatically assemble consensus SARS-CoV-2 genomes using a SARS-CoV-2 specific CLI workflow. The SARS-CoV-2 workflow allows you to process Illumina and Nanopore data. This contrasts with the generalized CLI pipeline for viral consensus genome assembly, where you can only analyze Illumina data. Below we list steps for SARS-CoV-2 genome assembly using the SARS-CoV-2 CLI pipeline for Mac and Windows operating systems (OS).
After reading this guide, you will be able to:
- Upload data to CZ ID for SARS-CoV-2 consensus genome assembly using the CLI
- View SARS-CoV-2 consensus genomes in the CZ ID web application
Install the CZ ID CLI and set up a connection with your CZ ID account
Make sure that you have the CZ ID CLI set up on your device before starting. If you have not installed the CZ ID CLI on your computer, please see "Step 1: Install the CZ ID CLI" and "Step 2: Set up an initial connection with your CZ ID account" within the user guide describing the generalized CLI workflow for viral consensus genome assembly. Follow the instructions for your OS.
Get your files ready
To upload files to CZ ID for SARS-CoV-2 consensus genome assembly, you need to have your project information and files ready. Make sure that all your files are in the same directory/folder. Once your files are ready, you can easily upload data to CZ ID using the CLI on your Mac or Windows device.
You will need the following files and information for your upload code:
Project name: Uploaded samples will be organized under a project.
-
-
- Reference an existing project by using the project name of interest while uploading samples through the CLI.
- If you would like to create a new project, you have to create it within your account using the CZ ID web interface first and use the new project name while uploading samples through the CLI. See “Creating a new project” within the Upload on the web guide for details.
-
- Sample name: If you are uploading only one sample, you should specify the sample name. Note that the same sample name should be included in your metadata file (see below).
-
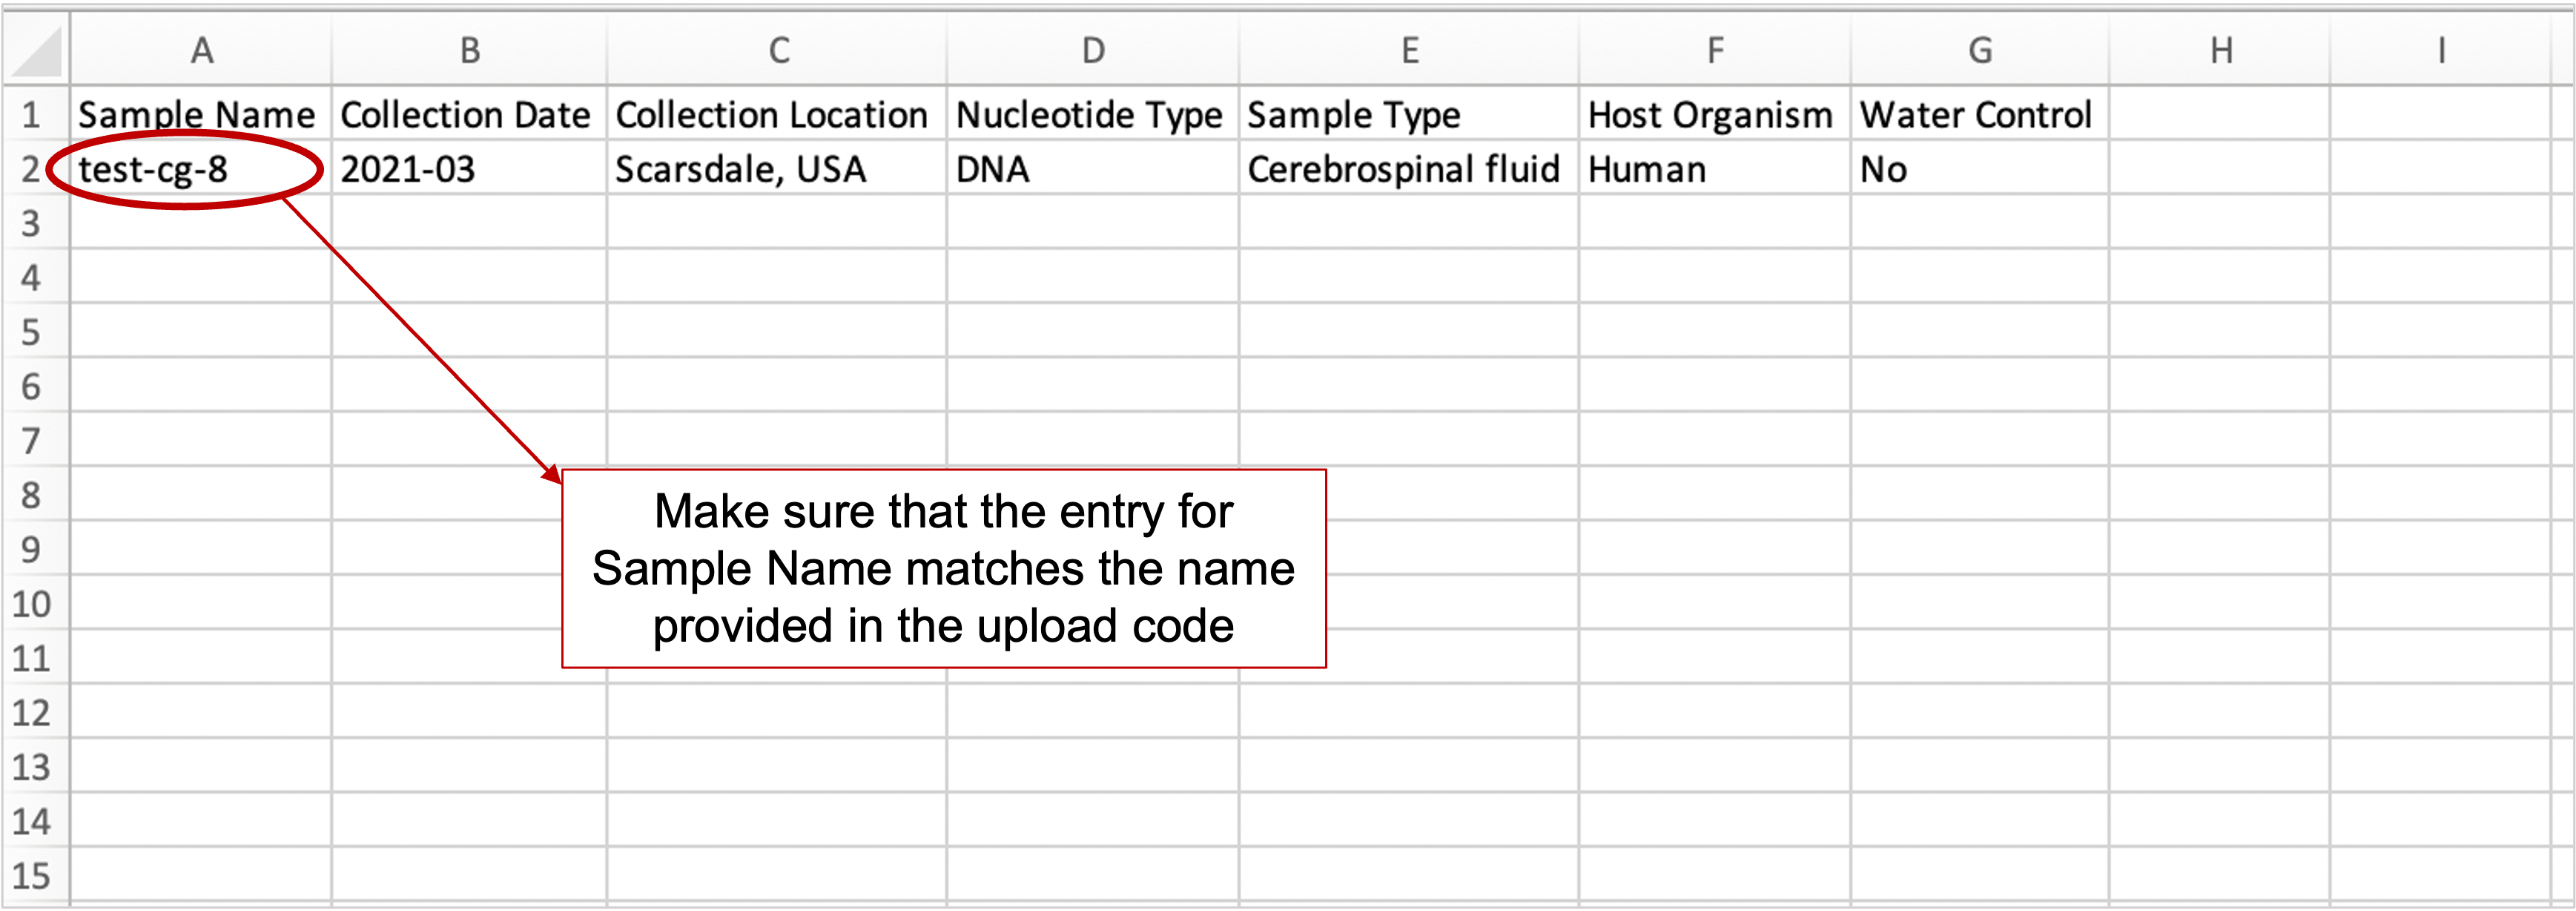
Metadata file: Sample information should be provided in a comma-delimited file (“csv” file extension). See Metadata instructions and dictionary for details regarding metadata requirements and format.
-
- If you download metadata for samples on your CZ ID account, the metadata file will be already in the correct format.
- If you need to prepare a metadata file, we recommend using our Metadata template to generate your file. Not all metadata in the template is required. If you don’t have information for a given metadata field, simply leave it blank. Save your edited file as a comma-delimited file (“csv” file extension).
- Note that there are seven required metadata entries for samples, including:
- Sample Name
- Collection Location
- If possible, provide information specifying more than the country. However, don’t provide more than county-level information to protect personally identifiable information.
- Collection Date
- Nucleotide Type
- Sample Type
- Water Control
- Host Organism
- When uploading one sample at a time to CZ ID, make sure that the Sample Name on the metadata file matches the sample name provided in the upload command (see step 3 regarding upload commands below).
-
-
Example metadata file for uploading a single sample.
Sequencing platform: Specify if the sequencing was performed with an “Illumina” or “Nanopore” platform.
-
Wetlab protocol: Specify the sequencing protocol used which will inform the pipeline which primers to trim.
-
- Options for Nanopore: "ARTIC v3" (default), "Varskip", "ARTIC v4/ARTIC v4.1", "Midnight"
- Options for Illumina: "ARTIC v3", "Combined MSSPE & ARTIC v3", "SNAP", "COVIDseq", "Midnight", "Varskip", "ARTIC v4/ARTIC v4.1", "AmpliSeq", "MSSPE", "ARTIC v3 - Short Amplicons (275 bp)"
-
- Medaka model: If you are analyzing Nanopore data, you should specify the correct medaka model for the best assembly results. Medaka is a tool used to create consensus sequences and variant calls from Nanopore sequencing data. Medaka models indicate i) the pore type, ii) the sequencing device (MinION or PromethION), iii) the base caller variant, and iv) the base caller version.
-
- The default CZ ID CLI consensus genome medaka model is r941_min_high_g360. You can use this default model if you are unsure of which medaka model to select.
- If you used a version of Guppy that does not use a corresponding medaka model, you should specify the medaka model with the highest version equal to or less than the Guppy version.
- Medaka model options: "r941_min_high_g340_rle" (default), "r941_prom_high_g303", "r941_prom_snp_g360", "r941_prom_high_g4011", "r941_prom_variant_g322", "r941_min_high_g344", "r941_min_high_g351", "r103_prom_high_g360", "r941_prom_high_g360", "r941_prom_high_g344", "r941_prom_snp_g303", "r941_prom_variant_g303", "r941_prom_variant_g360", "r941_min_fast_g303", "r103_prom_snp_g3210", "r103_prom_variant_g3210", "r941_prom_fast_g303", "r941_min_high_g303", "r941_min_high_g330", "r941_prom_high_g330", "r941_prom_snp_g322"
-
-
Read files: Specify the file containing sequence reads.
-
- CZ ID supports the following file types: .fastq/.fq/.fasta/.fa/.fastq.gz/.fq.gz/.fasta.gz/.fa.gz.
- You can specify a single file for single-end reads or two files for paired-end reads.
- If you are uploading more than 1 sample at a time, you can specify the path to a directorycontaining read files. The CZ ID CLI will search the directory for read files and automatically upload supported files types (.fastq/.fq/.fasta/.fa/.fastq.gz/.fq.gz/.fasta.gz/.fa.gz). Sample names will be assigned using file names.
-
Prepare your code and upload samples to CZ ID using a Mac OS
Preparing your sample upload code
Now that you have sample and file information ready, you can work on your code or command to upload sample files for genome assembly through the CLI. You will use this command to upload samples.
Write your upload command using a plain text editor. Below we provide code templates for uploading different types of files. You can copy the commands that suit your needs and edit accordingly using your text editor of choice. DO NOT USE MICROSOFT WORD or text editors that are not in plain text format because these programs will disrupt the required format and your code will not work.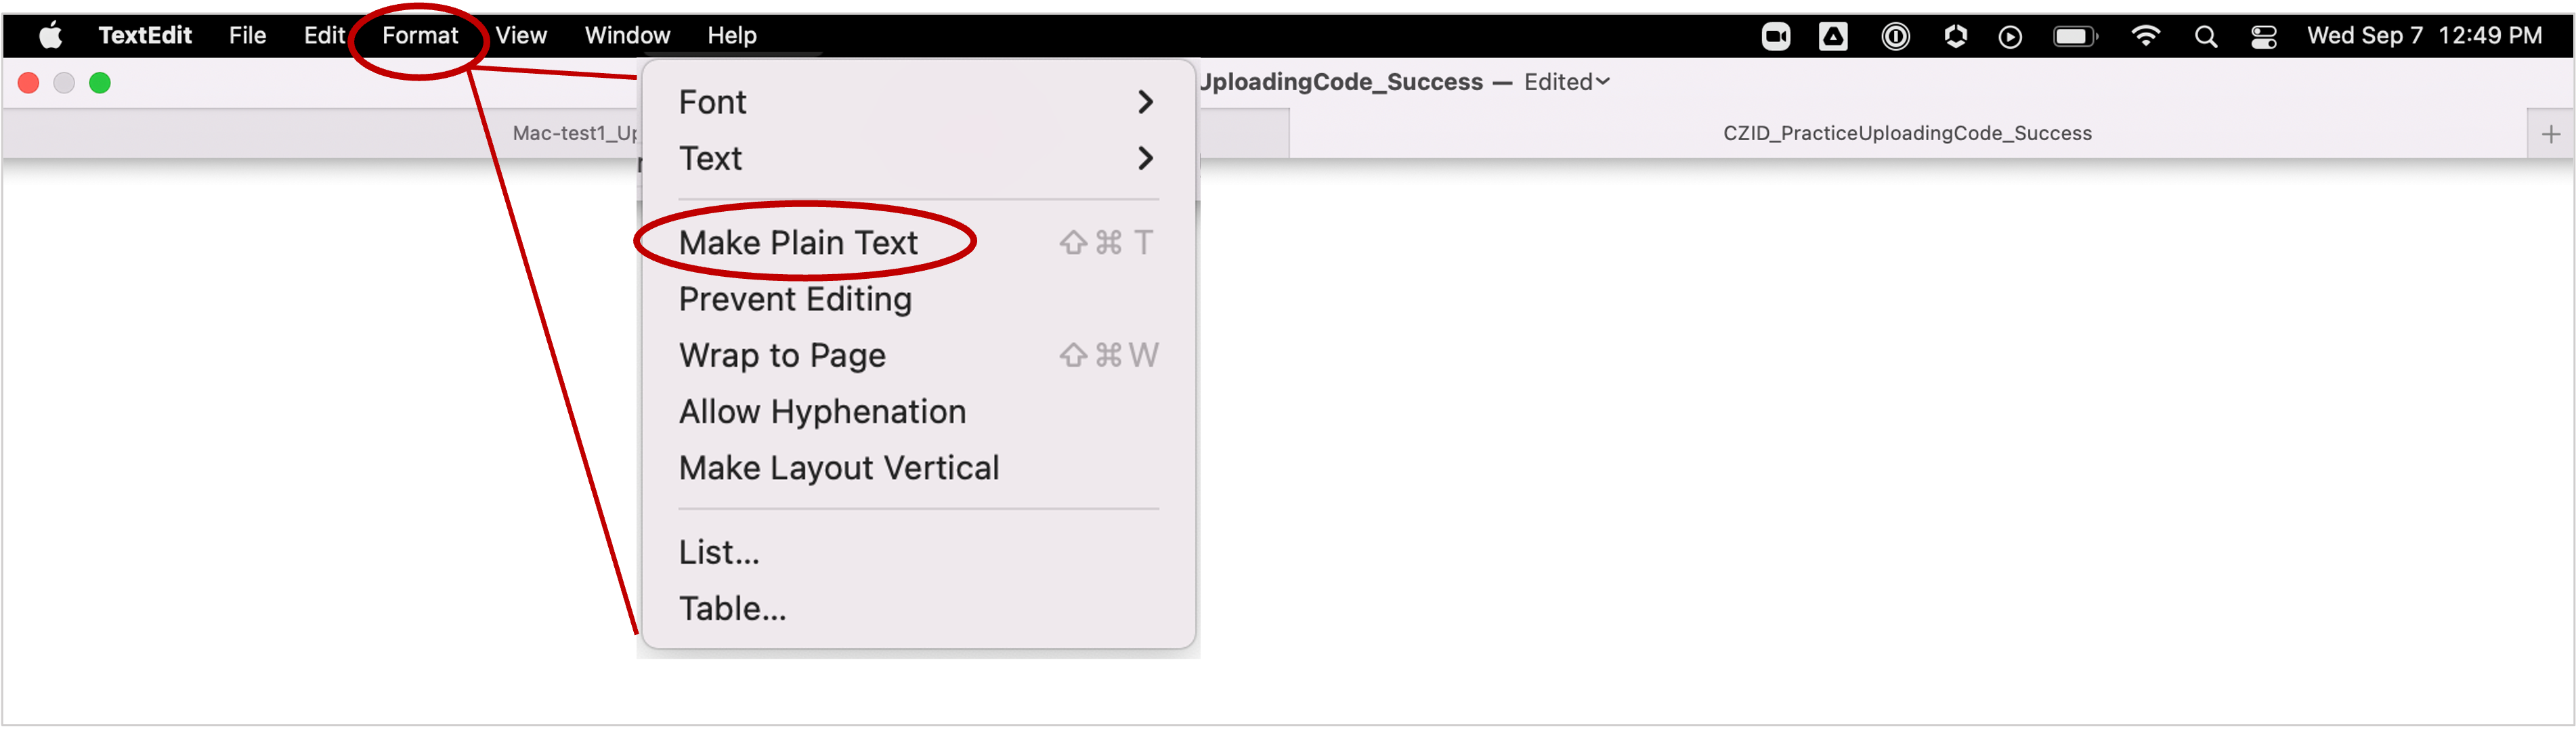 You can use TextEdit, a built-in text editor on Mac OS, to work on your upload code. However, make sure to set the format to plain text before pasting the code template.
Upload code templates
Upload a single Nanopore sample:
czid consensus-genome upload-sample \
    --project 'Your Project ID' \
    --sample-name 'Your Sample Name' \
    --metadata-csv 'Your_metadata_file.csv' \
    --sequencing-platform 'Nanopore' \
    --wetlab-protocol 'ARTIC v3' \
    --medaka-model 'r941_min_high_g360' \
    'Your_Sample_file.fastq.gz'
Upload multiple Nanopore samples:
czid consensus-genome upload-sample \
    --project 'Your Project ID' \
    --sample-name 'Your Sample Name' \
    --metadata-csv 'Your_metadata_file.csv' \
    --sequencing-platform 'Nanopore' \
    --wetlab-protocol 'ARTIC v3' \
    --medaka-model 'r941_min_high_g360' \
    'Path_to_samples_directory'
Upload a single Illumina sample:
czid consensus-genome upload-sample \
    --project 'Your Project ID' \
    --sample-name 'Your Sample Name' \
    --metadata-csv 'Your_metadata_file.csv' \
    --sequencing-platform 'Illumina' \
    --wetlab-protocol 'ARTIC v3' \
    'Illumina_Sample_R1.fq.gz' 'Illumina_Sample_R2.fq.gz'
Upload a multiple Illumina samples:
czid consensus-genome upload-sample \
    --project 'Your Project ID' \
    --sample-name 'Your Sample Name' \
    --metadata-csv 'Your_metadata_file.csv' \
    --sequencing-platform 'Illumina' \
    --wetlab-protocol 'ARTIC v3' \
    'Path_to_samples_directory'
Uploading samples to CZ ID for SARS-CoV-2 genome assembly
Now that your upload code is ready, you can upload sample files to CZ ID for consensus genome assembly and view assembled genomes in the web application. To do this:
- Log in to your CZ ID CLI account by opening your Terminal and typing the following command:
czid login - Set your directory to the folder containing sample files:
cd Path_to_directory - Copy and paste the your upload code into your Terminal and press enter.
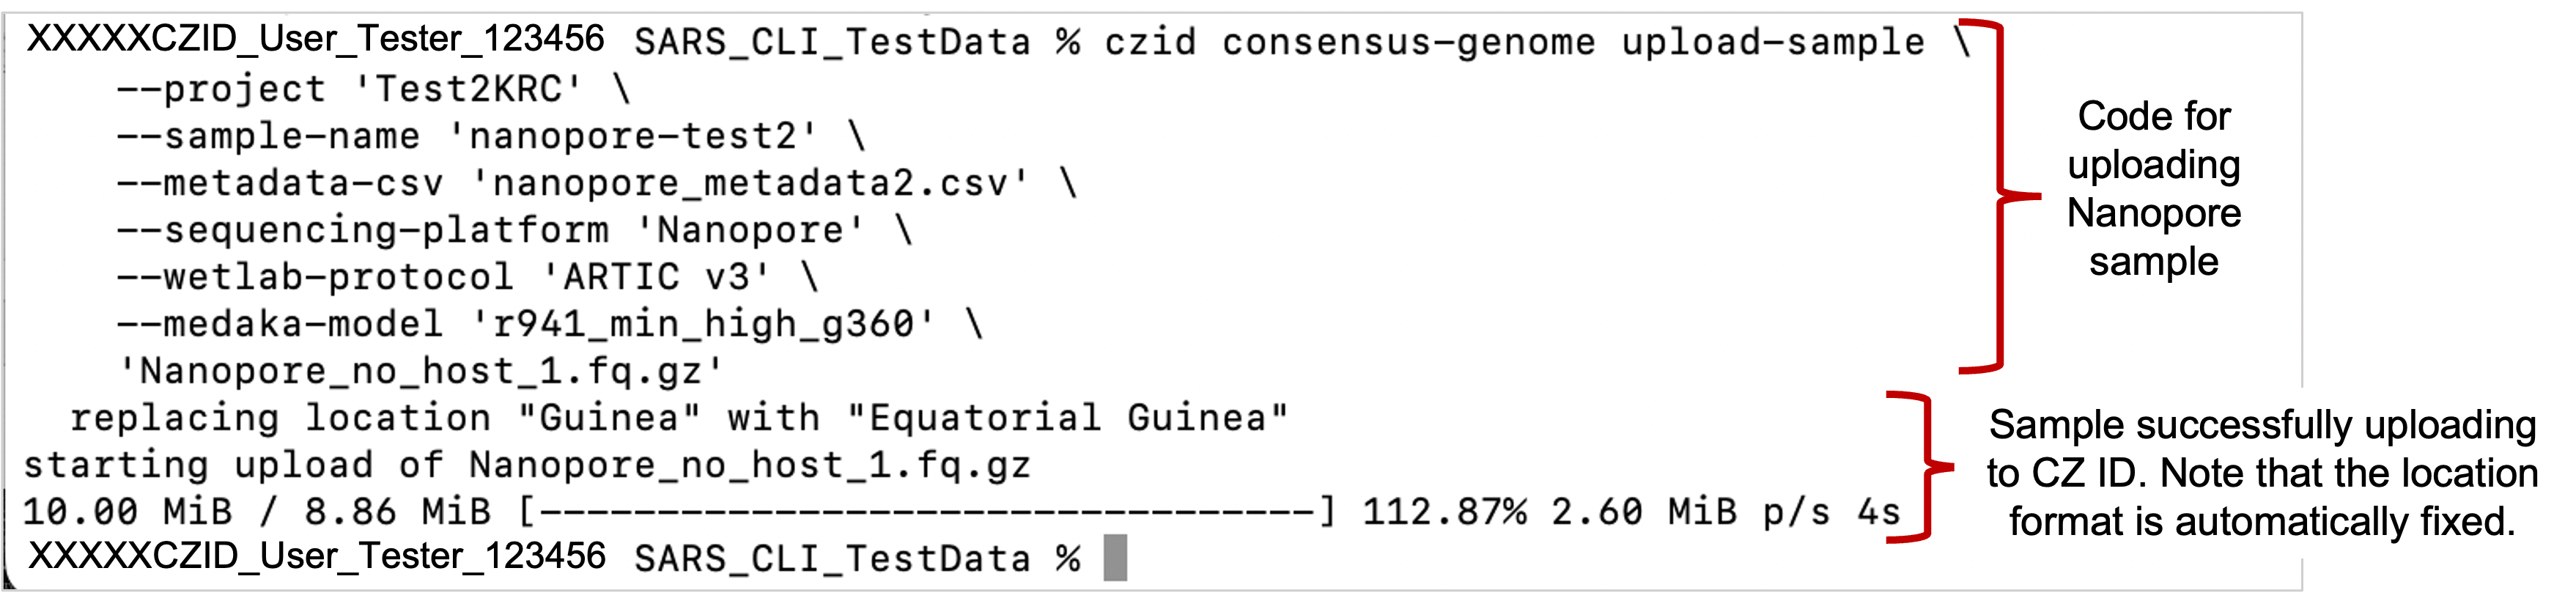 Example command for uploading a single Nanopore sample
 - SARS-CoV-2 consensus genomes will be automatically assembled after uploading your files.
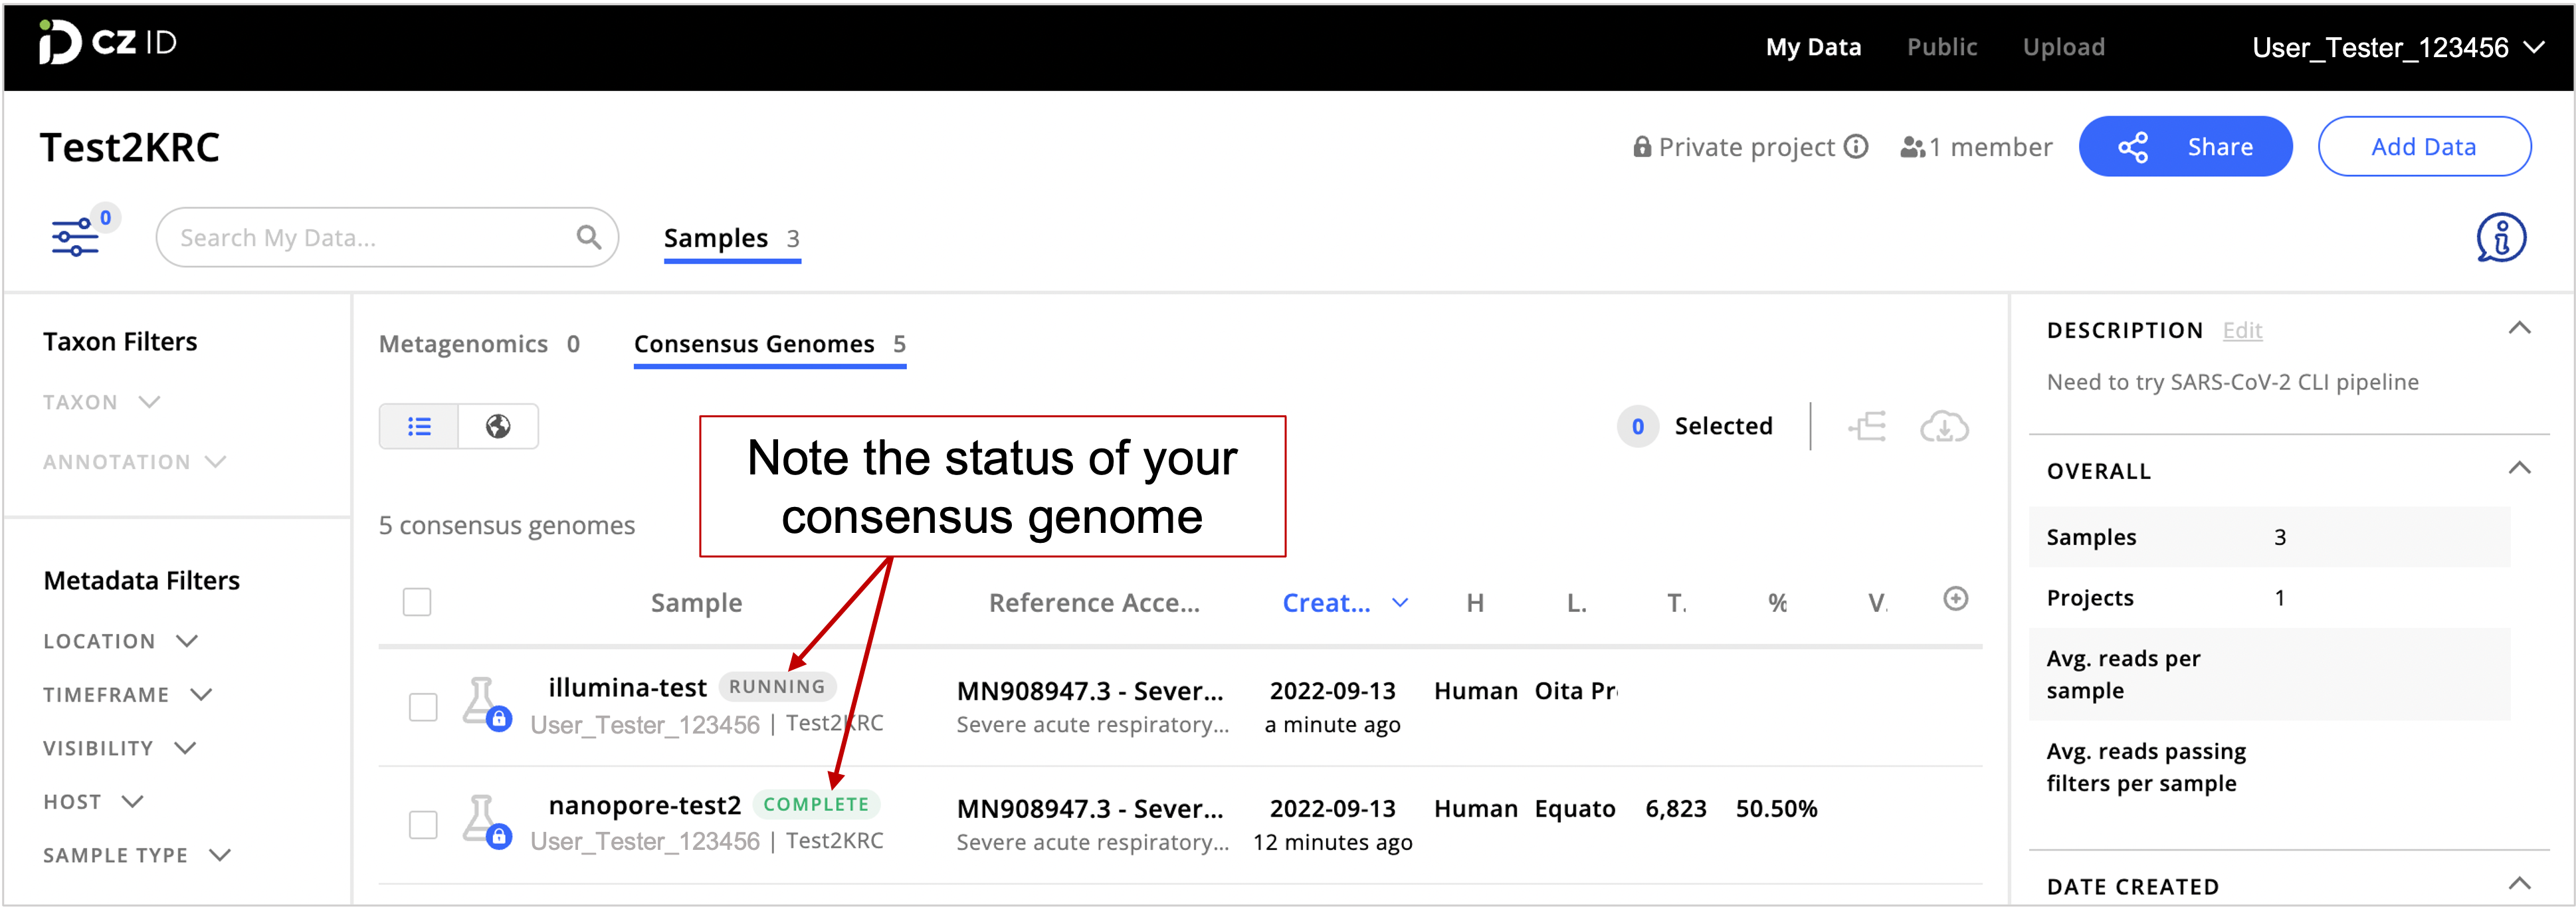
- Go to the CZ ID web interface and click on the Samples tab to check on the status of your consensus genomes. Genome assembly may take a few minutes.

Keep an eye on the status of your samples. If your sample has a “Complete” status, your SARS-CoC-2 consensus genome is ready. If the sample status indicates “Running”, assembly is in progress. A “Created” status indicates that samples are being uploaded. However, if the “Created” status doesn’t change to “Running” after a while, there might have been an error during file upload. Eventually, the platform will show a “FAILED” status for samples that had errors while uploading.
- Once “Complete”, see consensus genome details by clicking on a genome of interest. This is important to assess the quality of the SARS-CoV-2 genome.
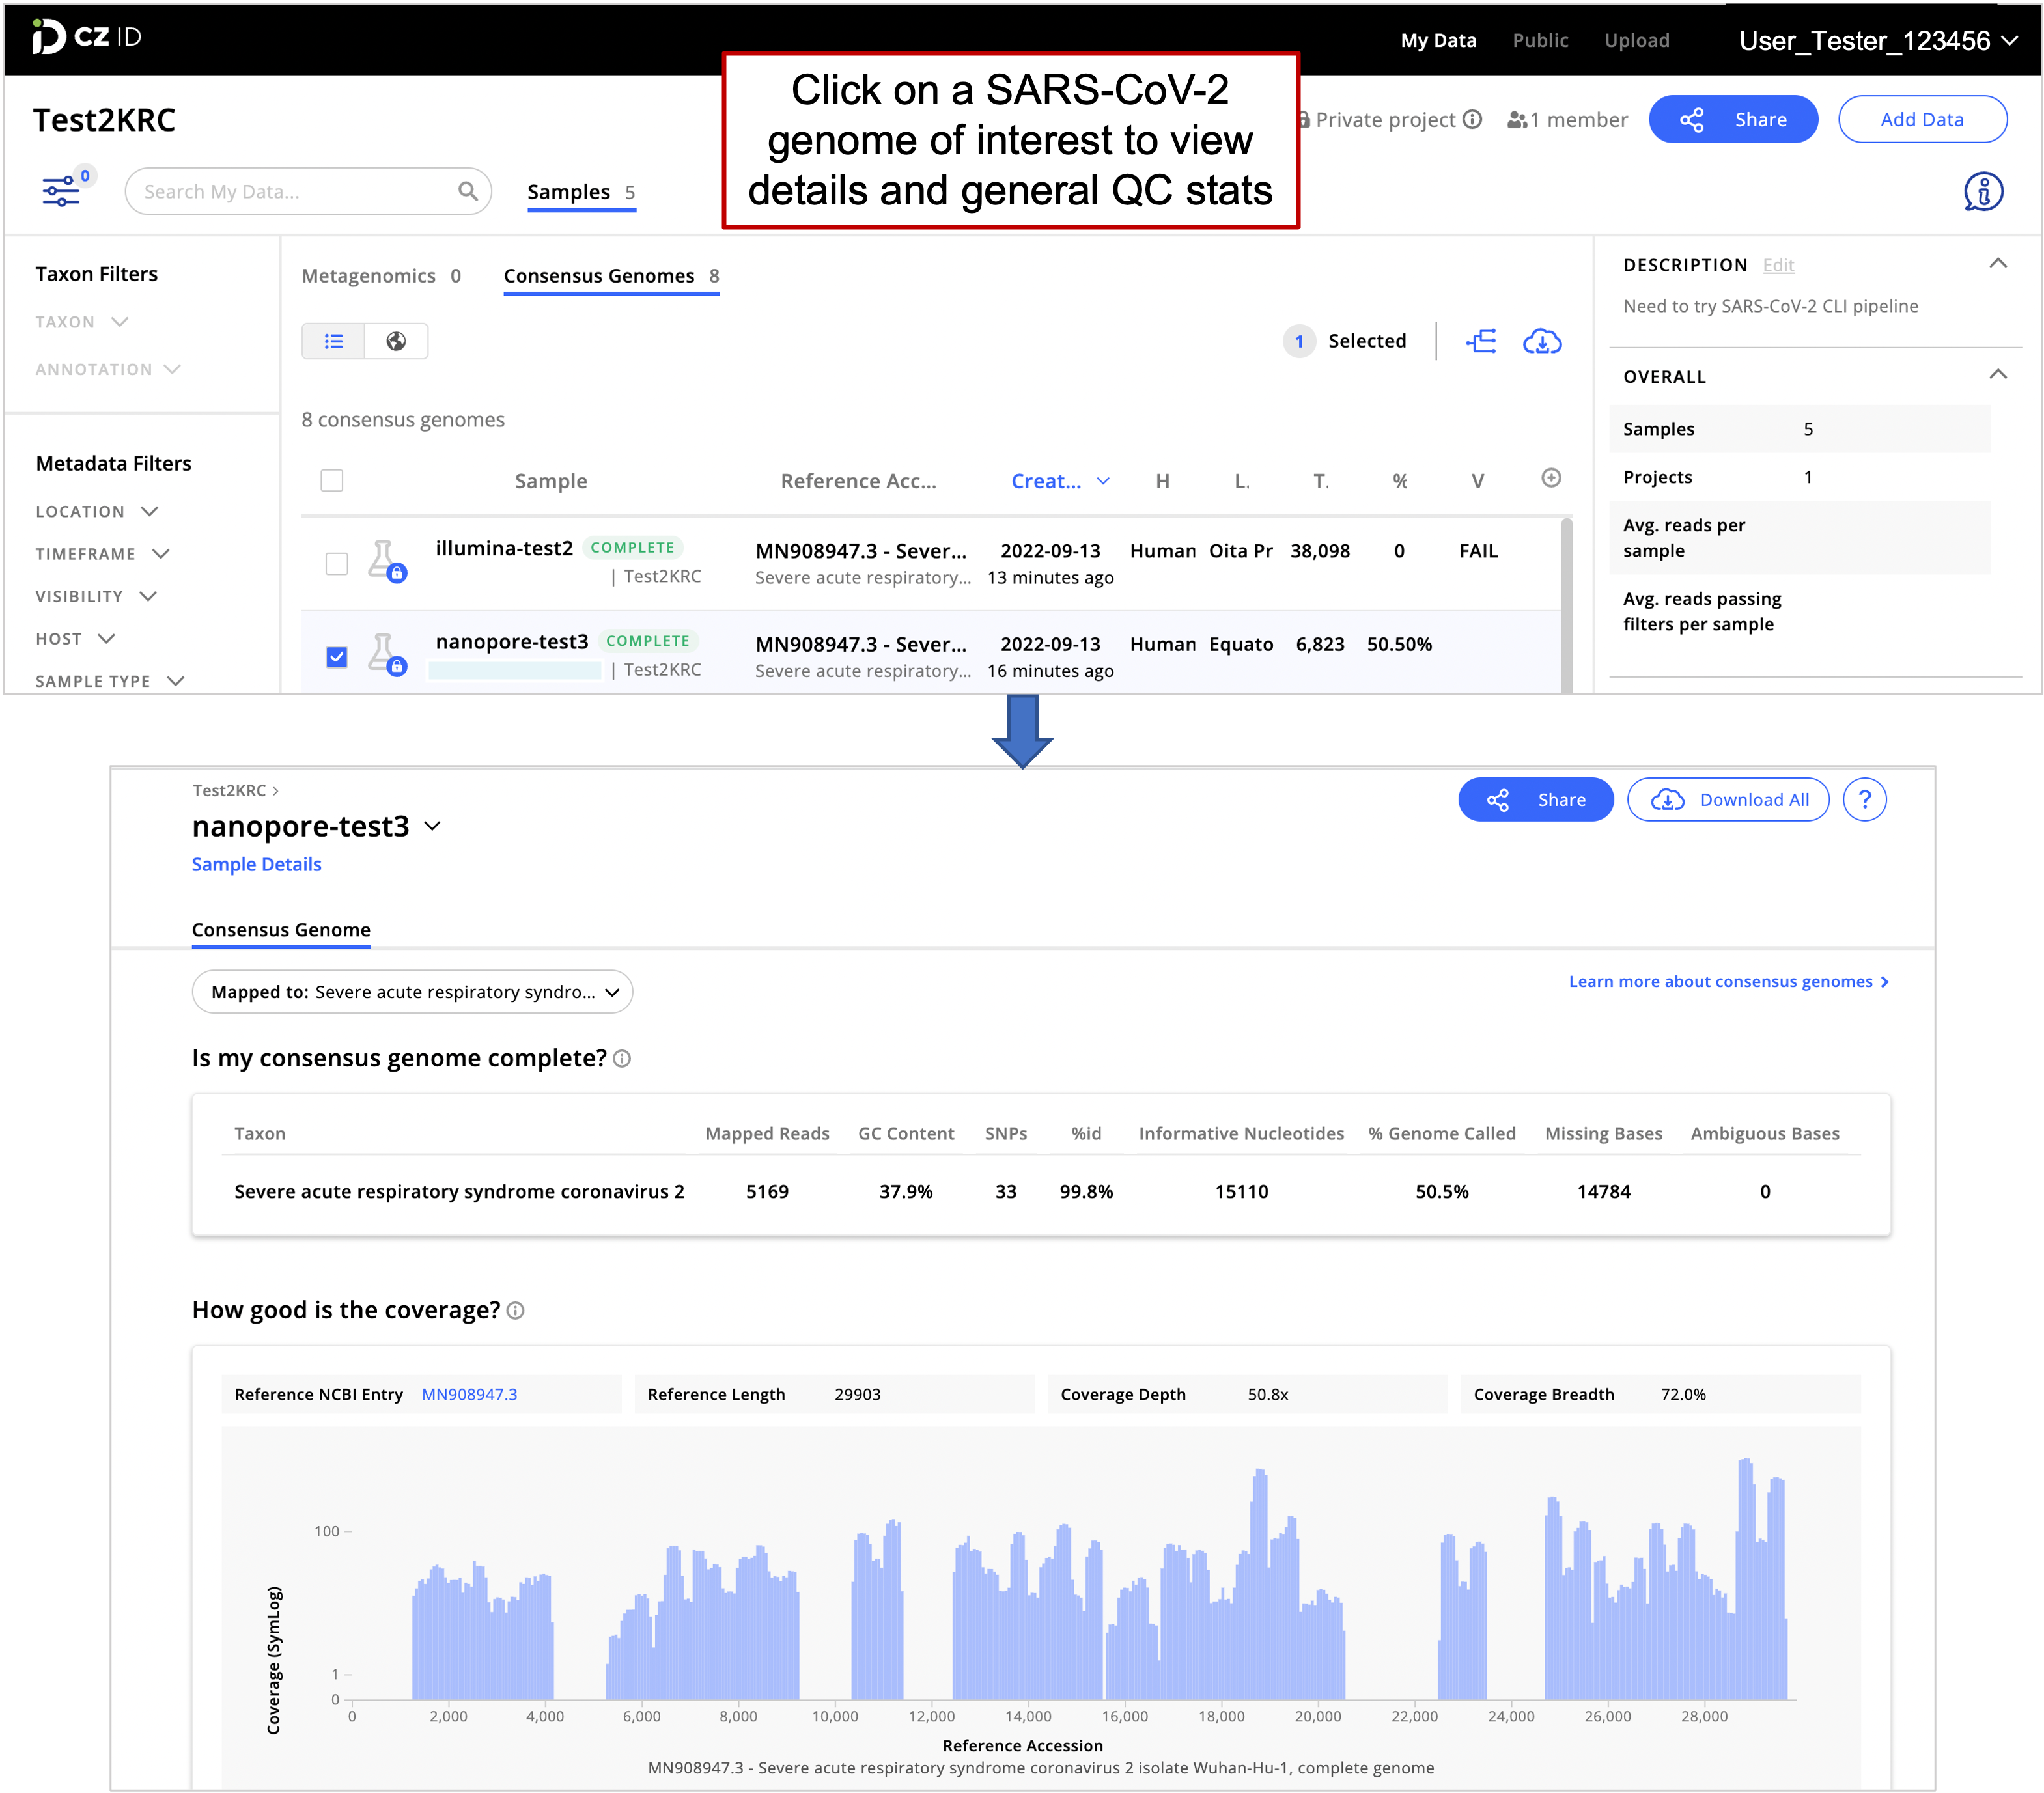 Sample list (top panel) and SARS-CoV-2 consensus genome assembly details for the selected sample (bottom panel)
Prepare your code and upload samples to CZ ID using Windows OS
Preparing your sample upload code
Now that you have sample and file information ready, you can work on your code or command to upload sample files for SARS-CoV-2 genome assembly through the CLI. You will use this command to upload samples (described below).
Write your upload command using a plain text editor, such as Notepad. Below we provide code templates for uploading different types of files. You can copy the commands that suit your needs and edit accordingly using your text editor of choice. DO NOT USE MICROSOFT WORD or text editors that are not in plain text format because these programs will disrupt the required format and your code will not work.
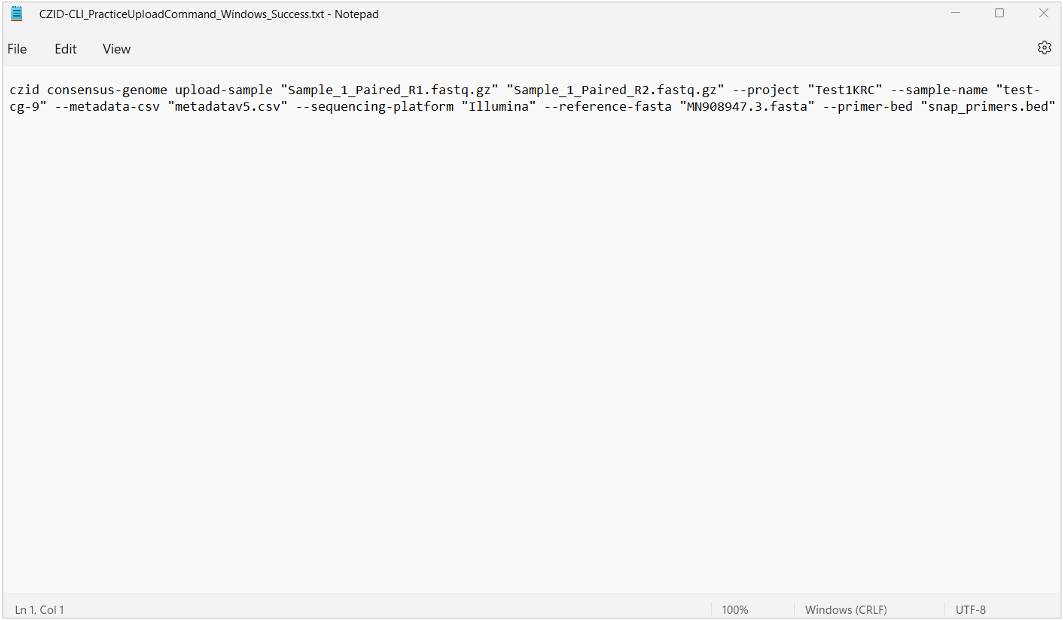
You can use Notepad to edit your upload code. Make sure there are not hard enters between command line arguments.
Upload code templates
The templates below show a long line of code, make sure to copy all the text. You can double-click on the template code to highlight all the text and then copy it. Drag your cursor to the right to scroll towards the end of the code line. Make sure everything is highlighted within the code block before copying the text to your clipboard.
Upload a single Nanopore sample:
czid consensus-genome upload-sample “Your_Sample_R1_file.fastq.gz” “Your_Sample_R2_file.fastq.gz” --project “Your Project ID” --sample-name “Your Sample Name” --metadata-csv “Your_metadata_file.csv” --sequencing-platform “Nanopore” --wetlab-protocol "ARTIC v3" --medaka-model "r941_min_high_g360"
Upload multiple Nanopore samples:
czid consensus-genome upload-sample “Path_to_your_sample_directory” “Your_Sample_R2_file.fastq.gz” --project “Your Project ID” --sample-name “Your Sample Name” --metadata-csv “Your_metadata_file.csv” --sequencing-platform “Nanopore” --wetlab-protocol "ARTIC v3" --medaka-model "r941_min_high_g360"
Upload a single Illumina sample:
czid consensus-genome upload-sample “Your_Sample_R1_file.fastq.gz” “Your_Sample_R2_file.fastq.gz” --project “Your Project ID” --sample-name “Your Sample Name” --metadata-csv “Your_metadata_file.csv” --sequencing-platform “Illumina” --wetlab-protocol "ARTIC v3"
Upload multiple Illumina samples:
czid consensus-genome upload-sample “Path_to_your_sample_directory” “Your_Sample_R2_file.fastq.gz” --project “Your Project ID” --sample-name “Your Sample Name” --metadata-csv “Your_metadata_file.csv” --sequencing-platform “Illumina” --wetlab-protocol "ARTIC v3"
Uploading samples for SARS-CoV-2 genome assembly
Now that your upload code is ready, you can upload sample files to CZ ID for consensus genome assembly and view assembled genomes in the web application. To do this:
- Log in to your CZ ID CLI account by opening your Command Prompt and typing the following command:
czid login - Set your directory to the folder containing sample files:
cd Path_to_directory - Copy and paste the upload code into your Terminal and press enter.
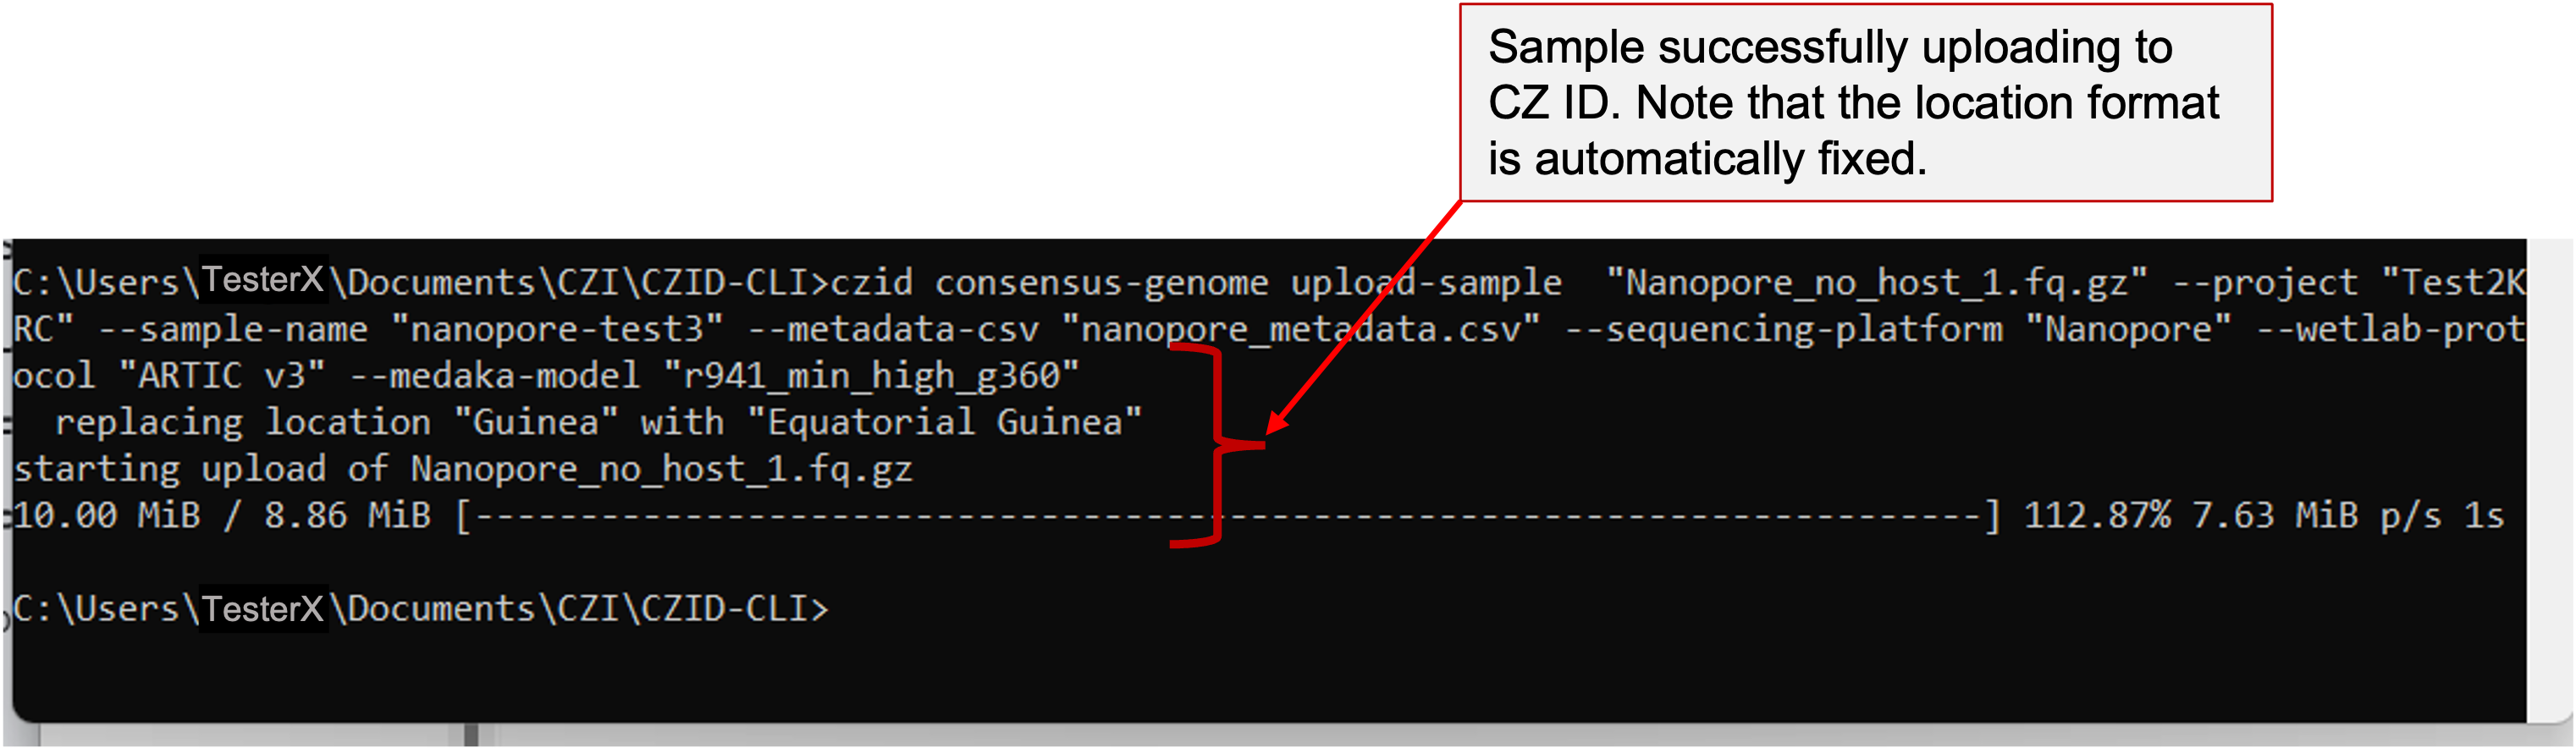 Example command for uploading a single Nanopore sample
 - SARS-CoV-2 consensus genomes will be automatically assembled after uploading your files.
- Go to the CZ ID web interface and click on the Samples tab to check on the status of your consensus genomes. Genome assembly may take a few minutes.
Keep an eye on the status of your samples. If your sample has a “Complete” status, your SARS-CoC-2 consensus genome is ready. If the sample status indicates “Running”, assembly is in progress. A “Created” status indicates that samples are being uploaded. However, if the “Created” status doesn’t change to “Running” after a while, there might have been an error during file upload. Eventually, the platform will show a “FAILED” status for samples that had errors while uploading.
- Once “Complete”, see consensus genome details by clicking on a genome of interest. This is important to assess the quality of the SARS-CoV-2 genome.
Sample list (top panel) and SARS-CoV-2 consensus genome assembly details for the selected sample (bottom panel)
Troubleshooting tips
- If you get an error message indicating “No such file or directory” after executing the upload command, make sure that:
- The spelling in your code matches the specified file names
- The files are found in the correct directory
- There are no weird characters between command line arguments (make sure you edit the code using a plain text editor)
- If you are having problems and getting unexpected error messages, some of which may refer to the CZ ID CLI GitHub page, make sure that you have the latest release of the CZ ID CLI. Check the CZ ID CLI GitHub page for updates.
Comments
0 comments
Please sign in to leave a comment.